Using a proxy with URL NetPhone
Using a proxy with URL Net Phone
Limitations: Windows and Mac OSX versions of this will work inside the software, Mobile platforms have other ways and can be quite tricky best to engage support for further assistance.
The reason behind using a proxy is to shorten what would be a lengthier path to get to a location.
For example, you might be in the USA and your VOIP provider is in Australia, to reduce that path from the USA via a few routes to get to your VOIP provider you might need to create a shorter more direct path.
So a proxy creates a connection between you and the server in which is closest to the VOIP server allowing it to connect to the shortest path for the registration of the device (Server to Server – according to the proxy) then the proxy takes this and passes and maintains the connection back to you in the USA.
Obtain the IP address of the Domain you are connected to
In Windows:
- Go to Start then use the search to type in cmd
- You should locate an application called Command Prompt
- Open Command Prompt
- Follow the further instructions section
If using Mac:
- CMD + Spacebar will open spotlight search
- Type in Terminal and open the Terminal application
- Follow the further instructions section
Further Instructions
You will need the last part of your username for the next section eg:YYY@XXXX.XXX.url.net.au so you will need the XXXX.XXX.url.net.au
Type in: ping XXXX.ZZZ.url.net.au ( Denote the full stops between each section: XXXX . ZZZ . url . net . au)
Wait for it to finish document the IP address XXX.XXX.XXX.XXX
To use the proxy settings in URL Net Phone you will need to go to the following:
Windows:
- Click the Softphone menu and then Account Settings
- Click the Edit button
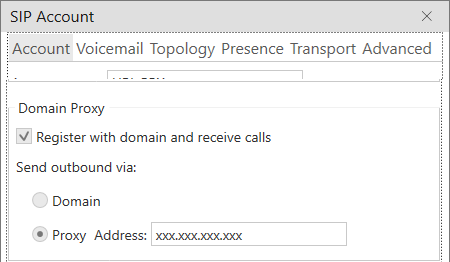
- Under the Account tab, locate the Domain Proxy section.
- Locate the Send outbound via; (Domain or Proxy)
- Select Proxy and enter the IP address we grabbed from above: XXX.XXX.XXX.XXX
- Click OK
Mac OSX:
- Click the Softphone menu and then Account Settings
- Double-tap on the account to open
- Under the Account tab, locate the Domain Proxy section.
- Locate the Send outbound via; (Domain or Proxy)
- Select Proxy and enter the IP address we grabbed from above: XXX.XXX.XXX.XXX
- Click OK